This post will help you finish your layouts like a pro. Please leave me a comment if you have questions about any of the layouts in your kit! You can see the Gallery of Pages by linking here.
1. Handle With Care

Back-fill the Cut-file
Trace lightly with pencil through the openings in the cut-file on to the patterned paper. Cut out the pattern paper a slight bit larger than your tracing mark. Glue the patterned paper to the back of the cut-file, covering the opening.
Once the cut=file is backed, glue it on to a full sheet of patterned paper. I used the Green/White shell paper. Notice how the very centre sun-ray wasn’t back-filled and the background paper is allowed to show through there.
Make your Tassels


I hung the tassels on gold thread and included it in your kit. Thread your tassels and tape the thread behind the heart embellishment as shown. I then popped up the heart embellishment with foam tape.

Add fun details

2. Snow Day
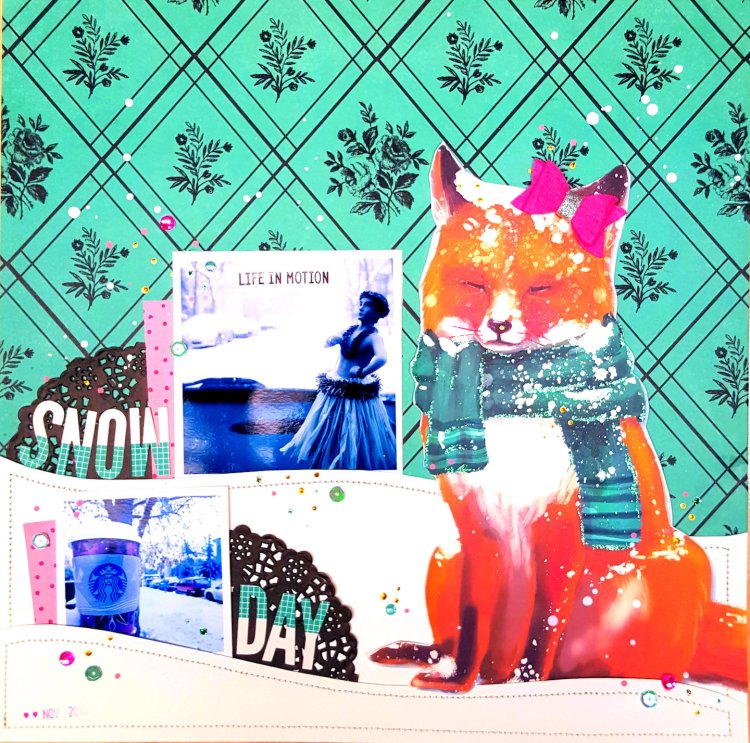
Make the snow drifts
Cut off the left side of the Fox paper and use it to make the snow drifts. Don’t tape the top of the drifts until you’ve tucked in the ephemera as shown. Fussy cut out the fox from the right side of the page and finish as shown. I’ve splattered the top with a little watered down white paint to imitate snow falling and stitched the snow drifts on my sewing machine.

Pretty Up the fox
I broke the paperclip off the bow and glued it near her ear. I added some pink Distress Ink on her nose and then edged parts of the scarf with the Stickles in the kit.

3. Hello Winter

Making a paper covered heart
Cover the heart in the kit with strips of paper as desired. I’ve added a running stitch of thread between the stripes for extra prettiness. Glitter the edge of ‘Hello Winter’ with Stickles in the kit.

Using the Pink Doily
A pink doily is included in the kit. It’s really bright. Turn it over and use the faded pink side in the layout.

4. Pawsome

Use nested circle die’s to cut out various sizes from your paper. (no dies? trace lids and cups then fussy cut) Use the largest circle to cut out your photo’s too. I used the dotted pink ribbon in a collage with the large blue flower and aqua mini clothes pin. I coloured the leaf with Black Distress Oxide to match the leaf in the paper.Do you have a sewing machine? Why not sew through your title ! 

5. My cup runneth over

The stamped images are done with Archival Ink. I used Distress Ink and a water brush to colour them. You could also use markers, just not Copic Markers, as they will pick up black Ink. Fussy cut butterflies to spill out of the T-cup. Want to make it extra pretty? Stitch around the boarder.
6. Wine Time
 Fashion a double swag banner from the circles. I taped them down then added a zig-zag across the top. Add a few bands of patterned paper across the bottom. I coloured the Washi Tape with some pink Distress Oxide. The clock and clock arms are in the kit. Trace the inside of the clock face on to patterned paper. Once cut-out, pop it up. I added dots on the clock face with Stickles. I taped the velvet ribbon in place along the bottom and added staples on the end for texture. Finally, why not add some sparkling Washi tape to the edge of your photo’s for added interest?

7. Merry & Jolly

Start the background
I’ve used the Snowflake patterned paper as both, the background and to back-fill the large pink snowflake cut-file in your kit.
To do this, cut a 8.5″ square out of the centre of the Snowflake patterned paper. Reserve this 8.5″ square to back-fill the large pink Snowflake cut-file.
Find the Pink Dotted pattern paper and trim 1″ off of all sides. Tape it into the centre of the remaining Snowflake patterned paper.
Complete the Snowflake Cut-file

Back-fill the cut-file with the Snowflake patterned paper. I added the pink gems to the ends. Then do the unthinkable, cut it into two parts as shown.
Lay the two parts of the snowflake on to the background as shown. Note how they’re slightly off-set.

Adding photos and finishing touches
I wanted some sparkling mats around my photos and simply taped the Washi Tape in the kit to two sides of a scrap piece of cardstock the same size as my photo’s.

I painted the chipboard ampersand gold then sprinkle gold dust on to the wet paint. (It’s a good idea to paint the ampersand white first as a base coat) The gold dust is included in your kit. Here’s the finished look on the layout.

Finally, add Merry/Jolly
These words were die-cut from gold and pink papers and included in your kit. The pink is meant to be a shadow. Glue the pink die-cut behind the gold die-cut slightly off-set and add them to your layout.

Add the Holiday Phrase
I cut the phrase into two parts. One is with my top photo, seen here and one with the bottom photo. I also popped it up and used some Stickles around the edge.

Please do let me know if you have any questions. Thank you for buying our November Kit ! I hope you’ll have loads of fun and learn a few new tricks along the way.
Cheers dears, Kelly

Wow! You spent a lot of time creating this post. Lots of amazing detail.
LikeLiked by 1 person
I did actually, LOL. When you stuff a whole lot of parts into a package, I thought it’d be nice to have a little direction even though Treasured Memories doesn’t usually send along info with the kit. People may not even make their pages the same as me, but if they want to, I wanted to help it along. xo
LikeLiked by 1 person